HTML Basics - Everything You Need To Know
This tutorial is part of a web programming course for people who have no programming experience.
In the previous lesson you learned about HTML elements, and how to use them to create the basic structure that every HTML document must follow. In this lesson we'll dig a little deeper into writing HTML elements in your code.
Before we dive into the HTML code, take a moment to install the software and files used in this course. I know some of you are cringing at the thought of having to install software, but the app that we use to write our code (Sublime Text) is very easy to install.
Setting Up Your Computer For This Course
Follow these steps before you watch the video below.
-
Install Sublime Text because we'll be using throughout the rest of the course. Click here to download Sublime Text. After you download the correct version for your computer, install it and follow all the defaults.
-
Click here to download the course files. After you download and unzip the course files, you'll have a folder called web-programming. You can put this folder anywhere on your computer.
Create a new file in the web-programming/HTML folder (the HTML folder that is located in the web-programming folder) and save it as html-basics.html. We'll use a keyboard shortcut in Sublime Text to generate the starting HTML code for us. Type 'html' into the file and press the tab key (make sure that there is no space between the cursor and 'html' when you press the tab key). Sublime Text should generate this code for you:
<!DOCTYPE html>
<html>
  <head>
    <title></title>
  </head>
  <body>

  </body>
</html>
Make sure to indent the head and the body elements as in the code sample above (Sublime Text may not have indented them for you).
If you participated in the previous lesson, this HTML code should be familiar to you. The first line of code is called the document type declaration and it indicates which version of HTML code is used in the page. The rest of the code are the elements that are required to create a valid HTML document. Every web page must include an html element, and nested within it there should a head element, and a body element. The head element should contain a title. The body element contains the content that appears inside the browser window. This is the basic structure that every page should start with.
The title element is empty now, so go ahead and put following text in between the opening and closing tags: HTML Basics
In this lesson we'll be spending most of our time adding elements to the body. Add an h1 element inside the body element. The text inside inside the h1 element should also say HTML Basics.
The code should now look like this:
<!DOCTYPE html>
<html>
  <head>
    <title>HTML Basics</title>
  </head>
  <body>
    <h1>HTML Basics</h1>
  </body>
</html>
Save your changes and open the page in the browser. Note that the text inside the title element is displayed in the browser tab, and that the text inside the H1 element is displayed in large bold font.
Please pay close attention to how each line of code is indented in the above code sample. Remember that we format our code to help us visualize the hiearchical structure of the web page. The concept of indenting and formatting your code is very important in other programming languages, as we'll see later in the course.
HTML and Structured Content
A web page displays content much like a news paper. If you look at a news paper you'll see that the content on the front page is structured in a way that makes it easy to read. The title of the headline story is big and bold and appears at the top of the page. There may be a short description of main story just below the title, which will be a smaller text size. The titles of other articles on the page will probably use bold font, but smaller than the title for the main story. The page will be laid out in such a way that it's easy to read and scan for the new stories that interest you. The page may also use different font colors to make it easier to read as well.
When programming a web page, we can use various elements to structure the content in the same way. In the last lesson we learned how to use h1 elements to add headings to our page (every page on your website should have a big heading near the top so that your visitors know what the page is about). There are also h2 and h3 elements, and the text that you put inside them will be smaller than the text in an h1 element.
Add the following elements to the body of the page, then save your changes and view the page in the browser. To refresh the page in the browser you press the F5 key.
<h2>This text is a bit smaller</h2>
<h3>This text is smaller yet</h3>
When you want to add a paragraph of text to your page, you should put it inside of a p element. The browser will automaticially put a bit of spacing between each of the paragraphs so that they don't all run together. Add the following paragraphs inside the body element, just under the h3 element.
<p>This is a paragraph of text.</p>
<p>This is another paragraph.</p>
Save your changes and view the page in the browser. Note that the browser puts some space between the paragraphs. So the p tags tell the browser when one paragraph ends and another begins. Also note that when you view your page in the browser, you don't see all the code for these tags, but you do see the effect they have on the content.
If you have a long paragraph, you could format it like this:
<p>
   This is a sentence in the paragraph.
   This is another sentence in the paragraph.
   And this is yet another sentence in the paragraph.
</p>
When you view page, note that the line breaks between the sentences in the code do not appear in the browser (more on this shortly).
If you want to make some text bold within a paragraph, you can use a b element.
<p>
   We have a <b>big sale</b> going on today!
</p>
What if you wanted to make text both bold and underlined? In that case you could use both a b element and a u element like this:
<p>
   We have a <b><u>big sale</u></b> going on today!
</p>
In this example we have nested the u element inside the b, we could have also done it so that the b element was nested inside the u element.
But the following code snippet is not proper because it goes against the concept of elements acting like containers:
<u><b>This is bold and underlined text</u></b>
Can you see the problem? It's not clear if the b element contains the u element, or if the u element contains the b element.
Block-Level and Inline Elements
All elements that are visible in the body of a web page will behave in one of two ways. If the element displays itself in the browser window as block-level it will try to occupy as much horizontal space as it can. Otherwise the element will appear to fall inline, which means that it will only occupy as much space as it needs to dipsplay its contents.
In the video you see how to use the Web Developer Tools to inspect the dimensions of an element. You can press the F12 key to open the devoper tools. This allows you to easily determine if an element is block-level or inlined.
To further illustrate I'll add a few examples of block-level and inline elements here (note that I've set background colors for them so that you can see how much space they occupy):
This is an inline element This is another inline element
As you can see, a block-level element will stretch out horizontally to occupy as much space as it can. On the other hand, inline elements will occupy only enough width to accomodate the content that is inside them, and they will line up next to one another as long as they have enough space to do so (if they run out of space, they will wrap to the next line).
At this point you don't need to worry about which elements are block-level and which ones are inline. It will become apparent as you continue to work with HTML more and more.
Self-Closing Elements
Until now, I've been telling you to think of elements as containers. But that's not true for all elements. Some elements cannot contain text or other elements. These elements consist of a single opening tag (instead of a pair of tags).
Here's an example of a self-closing tag:
<hr>An hr element puts a line across the page (hr stands for 'horizontal rule'), and it can be used to visually separate the content into sections. Note that it doesn't make sense to put anything inside an hr element because it's just meant to be a thin line, which is why it's self-closing.
By the way, the hr tag is a great example of block-level element because you can clearly see how it stretches out to occupy as much horizontal space as it can.
In earlier versions of HTML, the syntax for writing self-closing tags required a forward slash before the angle bracket at the end
<hr />The forward slash is no longer required, it's optional, but the nice thing about it is that it helps beginners to recognize an element as self-closing.
Another self-closing tag is the br element, which is used to add line breaks to a page. Before demonstrating the br element, it helps to see how white space in HTML code appears when the page is viewed in the browser. Consider this code:
<p>This is a              paragraph.</p>;


<p>This is another paragraph.</p>
This code looks a bit funny, but if you run it in the browser you'll see the the extra white space, and the empty lines do not show up on the page. White space, including line breaks and extra spaces in between words are ignored in the browser. So if you want to force a line break to occur, you can use the br element (we'll talk about forcing spaces to appear later).
<p>This is a paragraph.</p>
<br>
<br>
<p>This is another paragraph.</p>
In the code sample above, two br elements have been placed in between the paragraphs, which will force two line breaks to appear when the page is viewed in the browser.
It makes sense for a br element to be self-closing. Remember that self-closing tags cannot act as containers. It doesn't make sense for it to act as a container because it's basically just dead space.
Self-closing tags are also called void or empty. I'll just refer to them as 'self-closing'.
As a beginner, you may not know which tags are self-closing and which ones are not, but Sublime Text can help you with this because you just enter the tag name and press tab and it takes care of the rest. If the element is self-closing, then Sublime Text will not insert a closing tag for it.
Attributes
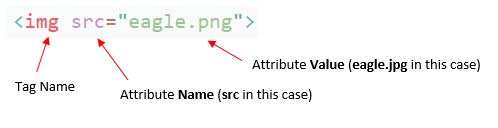
You can add extra information to an element by adding attributes to it. Let's assume that you want to display an image in your web page, you would use an img element, like so (note that the img element is self-closing):
<img>The code sample above tells the browser that an image should be displayed on the page, but it doesn't specify which image to display. In order to specify which image to display, we need to add a certain attribute to the img element.
<img src="../images/eagle.png">Now we've added a src attribute, which is short for 'source'. And we've set its value to ../images/eagle.png, which is the path to the image file we want to display on the web page. We will learn more about paths to files soon, but for now just note that the path tells the browser where to find the specific image that we want to display. As you learn more about HTML, you'll become familiar with the various attributes that can be added to elements.
Attributes are placed inside the opening tag of an element, in between the tag name and the right angle bracket (the 'greater than' character). In our example we used an img element, which is self-closing, so the attribute is placed inside the only tag that makes up the element.
The syntax for adding attributes to elements is this: Put a space after the tag name (in the previous example, the tag name was img, or simply the name of the element), then enter the name of the attribute (we added the src attribute). An equals sign and a pair of double quotes comes after the attribute name. The attribute value is placed in between the double quotes.
You can add multiple attributes to an element, just put a space between them, like so:
<img src="../images/eagle.png" width="200" alt="A bald eagle">The width attribute tells the browser how wide the image should be (in pixels). You could also add a height attribute, but you don't have to. The browser will set the appropriate height for the image based on the value of the width attribute. The alt attribute provides an alternative description of the element. If the image can't be displayed for some reason, then the value of the alt attribute will be displayed instead.
As a quick side note, the alt is very important (we'll discuss it more later). And every single img element that you use in a page should include an alt attribute that describes the image being displayed.
Let's add another self-closing tag to our sample page, but in this case we'll put it inside the head element. Remember that the head element is for meta data, which is information about the page that doesn't not necessarily appear inside the browser window. We'll add a link element, which won't directly appear in the page, but it will have a drastic effect on how the page looks. Add this code just under the title element. In Sublime Text, you simply have to type 'link' and then press the tab key. Then you'll notice that Sublime Text fills in the required attributes for a link element.
<link rel=StyleSheet type="text/css" href="../styles/sample.css">The link element is used to 'link' to a style sheet. We'll be learning much more about style sheets later in the course, but for now just know that they are used to make pages visually appealing. In this case, the style sheet that we are linking to will just alter some of the font colors.
The link element above has 3 attributes set. You can ignore the first two (luckily, Sublime Text filled in most of the details for us), but we must provide a value for the href attribute. The value that we entered for the href attribute is the path to the style sheet (a file named sample.css). When you 'link' to a file like this, it has the effect of importing all the code from the linked file into your web page. We'll learn more about creating style sheets later in the course.
A Note About Tags and Elements
Before moving on, I want to point out something that can be very confusing to people who are just learning HTML. Programmers often say 'tag' when what they really mean is 'element'. Technically, there is a difference. You have learned that unless an element is self-closing, it will consist of two tags (an opening tag and a closing tag). But instead of saying something like, 'add an h1 element to your page', programmers will often say 'add an h1 tag to your page'. As a beginner, you might assume that you are being instructed to add just an opening h1 tag, which is not correct (h1 elements must include both an opening and closing tag).
Now that you know all the basics of the HTML language, you just need to start learning about the various elements and attributes that you can use to build a page. Things should move pretty quickly for the rest of the HTML portion of this course In the next lesson, we'll talk about the elements used to display lists in your web page (such as bullet lists and numbered lists).
NEXT LESSON: HTML Relationships