HTML Relationships
This tutorial is part of a web programming course for people who have no programming experience.
As you know from the previous lessons, HTML documents are a hierarchy of elements. At the very top is the HTML element, it is the element that contains all of the other elements in the document. Because of this, the HTML element is call the root element.
Hierarchical structures can be visualized by using a tree diagram. Here's a tree diagram that represents a very simple HTML document:
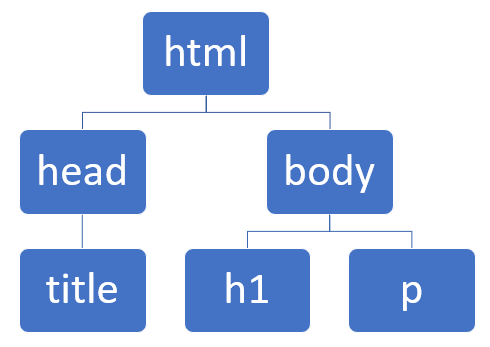
One thing that confused me about tree diagrams when I first learned of them is that they seemed like they were upside down in my mind. After all, trees grow up, right? Well, a tree diagram starts with the root and goes down (this is why the html element is call the 'root').
Tree diagrams are also useful for tracing family history, and they are helpful in understanding how people are related. The concept of relationships applies to HTML elements as well, and when talking about the elements that make up a web page it's helpful to describe them by their relationships. The HTML element can be thought of as the mother of all other elements. In our diagram above, we can say that the html element has two children, which are the HEAD and BODY elements. The HTML element is the parent of the HEAD and BODY elements. And because they have they same parent, they are siblings.
It's very important that you are aware of these relationships in HTML (parents, children, siblings). As we move through this course because I'll often say something like, "Add a P element, and make sure it's a child of the BODY". This means the the P element be contained within the BODY (and therefore it should be written in between the opening and closing BODY tags.
While the diagram above represents an extremely simple HTML document, in the real world the code for a web page can very quickly become extremely complicated, with thousands of elements. And when we are writing our code, it's the indentation that helps us to see the relationships between elements. So YOU SHOULD ALWAYS INDENT YOUR CODE PROPERLY! I cannot stress this enough, and indentation is critical to make code readable in just about every other programming language.
Here is what the HTML code should look like for the document that is represented in our tree diagram above:
<!DOCTYPE html>
<html>
  <head>
    <title>HTML Basics</title>
  </head>
  <body>
    <h1>HTML Basics</h1>
    <p>This is a paragraph...</p>
  </body>
</html>
It's easy to see the relationships between the elements because of the indentation. Child elements are indented within their parents, and siblings are vertically aligned (each sibling uses the same number of tabs for indentation)
Now compare the previous code sample with this one:
<!DOCTYPE html>
<html>
    <head>
    <title>HTML Basics</title>
  </head>
  <body>
<h1>HTML Basics</h1>
    <p>This is a paragraph...</p>
  </body>
</html>
Even though I've only mess up two lines, this code makes me want to puke. As a beginner, the differences between these two code samples may not seem like much, but as you get more experience it should become easy to spot formatting errors. Luckily it's such a simple web page that it wouldn't take long to put things back in order. But as I mentioned, it's not uncommon for a web page to be made up of thousands of elements. So if you don't format your code well, every step of the way, it can quickly become unreadable. I worry about students who do not indent their code properly because it's so difficult to read sloppy code. Sloppy code leads to bugs, and makes it much more difficult to find and fix them.
Keep in mind these relationships, and the practice of formatting your code properly. They will help you greatly in the upcoming lessons as you add more and more elements to your pages.
NEXT LESSON: HTML Lists